You can hatch eggs even if you have no hens by using an incubator.
Incubators attempt to reproduce the conditions fertile eggs experience
under a brooding hen, including appropriate temperature, humidity and
ventilation levels. To successfully hatch eggs in an incubator, you will
need to properly calibrate the incubator and be able to keep the
settings stable throughout the incubation period.
Preparing to Use the Incubator
- Find an incubator to use to hatch eggs. You will need the directions for the particular type and model you plan to use. Look for a serial number on the incubator and the manufacturer's name. Look for directions on the manufacturer's website, or contact the company's customer service department by phone or email to obtain directions if you do not have written directions for using the incubator.
- Place the incubator in an area with little to no temperature fluctuation. Avoid placing the incubator near a window or air vent, or any area that experiences drafts.
- Plug the incubator's cord into a dependable electric outlet. Make sure you don't plug the cord into an outlet where it could easily detach, or where children might be able to unplug it.
- Add warm water to the incubator's humidity pan. Consult the directions for the incubator for the correct amount of water to add.
- Calibrate the incubator's temperature.
You must calibrate the incubator to ensure you have correct and stable
temperature levels a minimum of 24 hours prior to incubating eggs.
- Make sure to adjust the incubator's thermometer so that it will measure the temperature around where the center of an egg will reach in the incubator.
- Adjust the heat source until the temperature reading is between 99 and 102 degrees F (37.2 and 38.9 degrees C). Correct incubator temperature is very important as low temperatures can keep the embryos from developing and overly high temperatures can kill the embryos and cause abnormalities.
- Wait 24 hours and check the temperature reading again. The
temperature should still be within the target range. Do not add eggs if
the temperature has fluctuated outside of the target range as the eggs
will not hatch properly.
- Obtain fertile eggs for hatching. You will want to incubate the eggs within 7 to 10 days after they have been laid. Viability decreases as the eggs age.
- Consider how many eggs you want to incubate. Keep in mind that it is very rare for all of the incubated eggs to hatch and that certain species have higher viability than others when choosing which type of birds to hatch and how many eggs to purchase.
- Locate hatcheries or farmers in your area who sell eggs for hatching. You will need to get eggs that are produced by hens in a flock with a male bird, otherwise the eggs may not be fertile.
- Contact your local agricultural extension office if you have difficulty finding an egg source. The office may have recommendations for local poultry farmers.
- Store eggs in cartons at 40 to 70 degrees F (4.5 to 21.1 degrees C). Rotate the eggs daily by propping up different ends of the carton each day or carefully turning over the carton.
Incubating the Eggs
- Warm the fertile eggs to room temperature.
Allowing the eggs to warm up will decrease the amount and duration of
temperature fluctuation in the incubator after you've added the eggs.
- Mark each side of the eggs with a symbol. Many people use X and O to indicate each side of the egg.
- Use a pencil and lightly draw a symbol of your choice on 1 side of the egg and draw a second symbol on the other side.
- Use a pencil and lightly draw a symbol of your choice on 1 side of the egg and draw a second symbol on the other side.
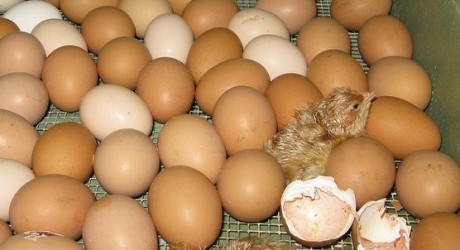
- Place the eggs carefully into the incubator.
Make sure the eggs are lying on their sides. The larger end of each egg
should be slightly higher than the pointy end. This is important as the
embryos can become misaligned if the pointy end is higher and may have
difficult pipping, or breaking through the shell, when it comes time to
hatch.
- Allow the temperature to drop after adding the eggs.
The temperature will temporarily lower after you've introduced the eggs
into the incubator, but it should readjust if you've calibrated the
incubator correctly.
- Don't increase the temperature to compensate for this fluctuation or you may damage or kill your embryos.
- Don't increase the temperature to compensate for this fluctuation or you may damage or kill your embryos.
- Record the day and how many eggs you've added to the incubator.
You should be able to estimate your hatch date based on average
incubation times for the bird species you want to hatch. For example,
chicken eggs typically take 21 days to hatch, while many duck varieties
and peafowl may take 28 days.
- Turn the eggs daily.
Rotating the eggs and changing their position helps mitigate the
effects of any temperature differences within the incubator and mimics
the behavior of a brooding hen.
- Turn eggs an odd number of times each day. This way, the symbol on the eggs will change every day after you turn the eggs, making it easy to see whether or not you've turned the eggs yet for that day.
- Move eggs around to different positions in the incubator.
- Stop turning the eggs during the last 3 days of incubation, as at
this point, the eggs will soon hatch and turning is no longer necessary.
- Adjust the humidity levels in the incubator.
Humidity should be around 50 to 55 percent throughout incubation,
except during the last 3 days when you will want to raise it to 65
percent. You may need higher or lower humidity levels depending on the
type of eggs you wish to hatch. Consult your hatchery or the available
literature on hatching your species of bird.
- Replenish the water in the water pan on a regular basis or the humidity levels will drop too low. Always add warm water.
- Add a sponge to the water pan if you need to increase the humidity.
- Measure the humidity level in the incubator using a wet bulb
thermometer. Take a reading with the wet bulb thermometer and also
record the temperature in the incubator at the time. Consult a chart or
psychrometric chart online or in a book to find the relative humidity
from the relationship between the wet bulb and dry bulb temperature
readings.
- Ensure the incubator has adequate ventilation.
There should be openings on the sides and top of the incubator to allow
air flow-check to make sure these are at least partially opened. You
will need to increase the amount of ventilation once the chicks begin to
hatch.
- Candle the eggs after 7 to 10 days.
Candling the eggs is when you use a light source to view how much space
the embryo occupies within an egg. After 7 to 10 days, you should see
development of the embryo. Candling allows you to remove eggs with
embryos that are not viable.
- Find a tin can or a box that can fit over a light bulb.
- Cut a hole in the can or box that is smaller in diameter than an egg.
- Turn on the light bulb.
- Take 1 of the incubated eggs and hold it over the hole. If the egg appears clear, the embryo has not developed or the egg may never have been fertile. You should see a cloudy mass if the embryo is developing. The embryo will increase in size as you near the hatch date.
- Remove any eggs that do not show a developing embryo from the incubator.
- Prepare for the hatch.
Discontinue turning and rotating eggs 3 days prior to the estimated
hatch date. Most viable eggs will hatch within a 24 hour period.
- Place cheesecloth under the egg tray prior to hatching. The cheesecloth will help catch bits of eggshell and other matter during and after the hatch.
- Increase the humidity level in the incubator by adding more water or a sponge.
- Leave the incubator closed until after the chicks hatch.
- Remove dry chicks to a prepared area. You can also leave the chicks in the incubator an additional 1 to 2 days, but you will want to lower the temperature to 95 degrees F (35 degrees C).
source
